





















To read my blog in a READER use: http://feeds.feedburner.com/theredheadriter

Showing posts with label Wordpress. Show all posts

How To Enter Your Blog In A Linky


So often on the Woo Us To Your Blog posts, I have people who ask me "How do I get my blog in that Linky thing you use?"

I'm going to make it easy for you today with a tutorial. No matter where you go on the web, if you want to enter your blog on a LINKY the steps will be about the same.

It is very easy to do. Let's start...


STEP 1


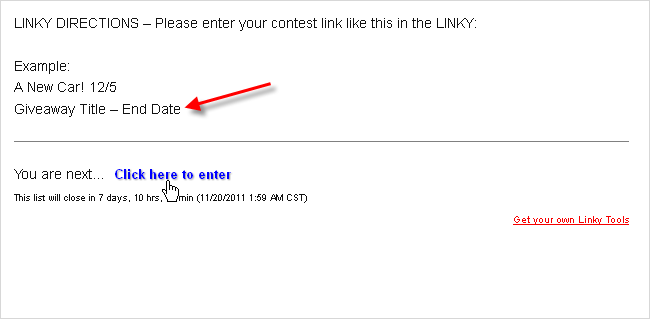
Notice the format the hosting blog requests that you use when posting a link in the LINKY. For giveaway posts, most of the time the format is "Giveaway Title" followed by "The date that the giveaway ends".

Other times that a LINKY is used, you may be asked for the name of a particular post and your name or your blog's name.

After you determine the format for the link entry, click the words CLICK HERE TO ENTER.


STEP 2


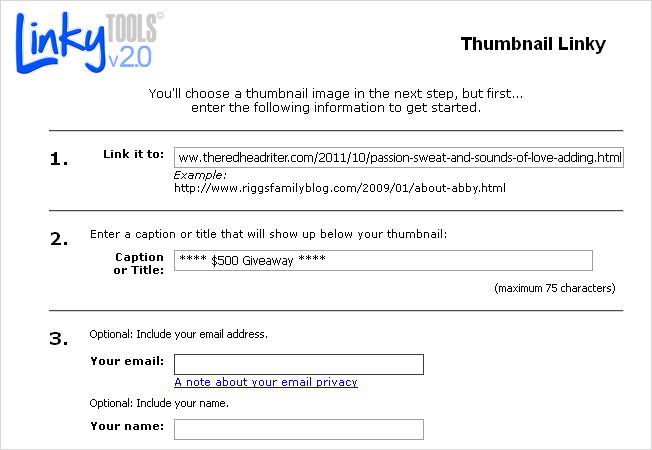
At this point, you'll have a pop up either on the page or in a new window. For my LINKY, I use the thumbnail option and have it open in a separate window.

Enter the link to the post or your main blog URL.

Next, enter the title of your post or your blog.

You do not have to put your email address or name because neither appear for the public.


STEP 3


This next step, choosing a picture for the thumbnail, is the step that confuses most people.

There are two radio buttons (that's the round circles with a dot in one of them) and you have to choose whether the photo you use should be cropped by you ("Let me crop my own image") or randomly cropped by the program ("Auto crop my image"). I suggest that you crop your own image so that you have a little more control of the part of the photo that will be shown in the LINKY.

Now you have to choose the image you want to appear in the thumbnail.

If you have pictures on your blog, you can choose the option FROM WEB which is what I will show you in this example.

FROM FILE means that you have the photo stored somewhere and you can provide the URL of the photo to drop in. The photo would be hosted somewhere like Photobucket or your site's media file.

GENERIC is some icon that has nothing to do with your blog, so it is best not to choose it.
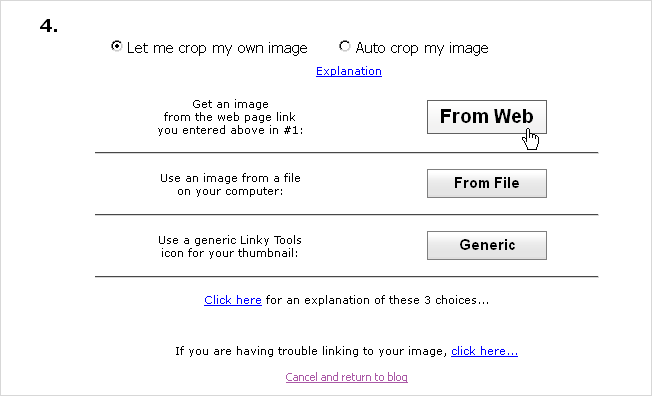


STEP 4


Since you chose FROM WEB, many of the pictures found on your blog will appear including the ones found in the post you chose to link up.

Click on the picture you want to use in the LINKY.
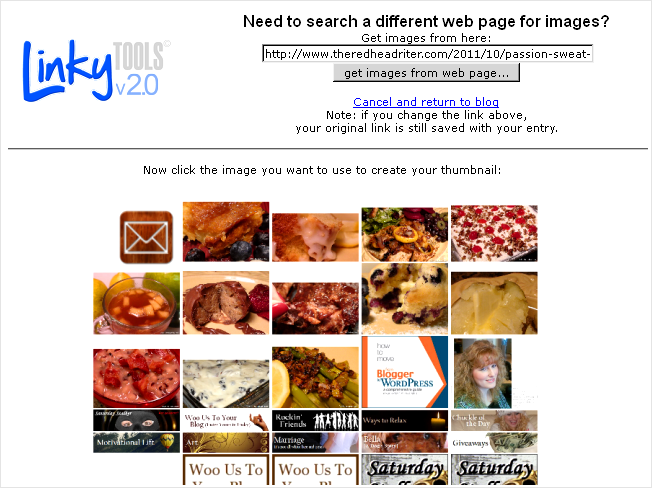


STEP 5


You will have yet another page appear with the image you have chosen to crop.

Adjust the amount of the image that will be shown by clicking on the lighter part of the picture and sliding it left and right. You can also click on the gray dots along the edge and make the highlighted square larger.

When you have the picture cropped to your specifications, click the words, CLICK HERE TO CROP YOUR IMAGE...
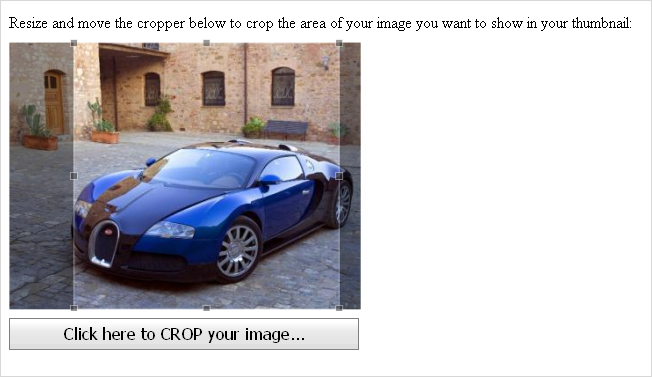


STEP 6


Now you will be taken back to the original blog where you will see the image you just cropped linked to the URL on your blog that you had previously chosen. Underneath the picture, the title of your giveaway, blog or post will appear.
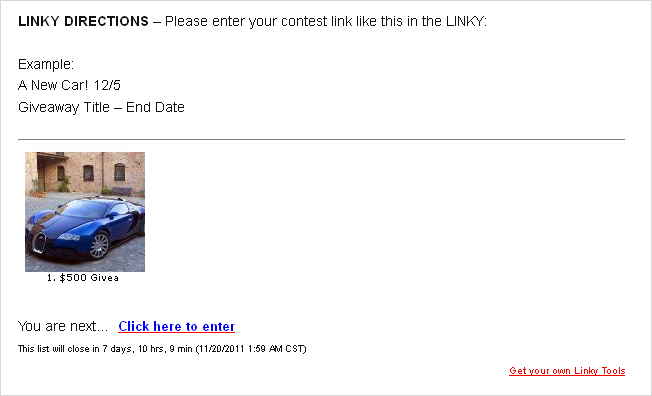


You're finished!

Woohoo!

Was entering the information into the LINKY easier than you thought and less complicated?

I hope so!!!


The Redhead Riter


Top 25 Reasons To Use WordPress For Your Website-Business & Blog


Top 25 Reasons To Use WordPress For Your Business Website Or Blog

Versatility Supports Creativity


Although WordPress was designed for blogging, it can be used for business websites as well because it is built on PHP/MySQL. To help make sense of the concept, PHP originally was the acronym for "Personal Home Page," but now stands for "PHP: Hypertext Preprocessor". PHP is a processing language that is embedded into HTML and interpreted by a web server. MySQL (Structured Query Language) is a relational database management system that runs as a server.

Although PHP and MySQL can be used independently of one another, together than can do what neither can do alone. By combining PHP and MySQL, your website will be able to instantly deliver information online and "instantly" is what the public demands.

Does all that sound complicated?

A few years ago, I was the Web Master and updated my company's website using a a powerful Content Management System (CMS) called Interwoven. It can store images, PDFs, other documents, video and audio. In the late 90's, many of the Fortune 500 companies used Interwoven to create and update the web pages on their website and obviously, some companies still do.

Interwoven was extremely expensive.

Jump to 2011 and you will find a scaled down, but highly effective CMS called WordPress which is available with a price tag of....FREE.

Versatility for free.

The price couldn't be better.


Forever Free

Forever Free


WordPress is an Open Source software which basically means it is free to the public. There are other open source software solutions that ultimately lead to a product that will charge after you get to a certain size or add the best features.

The definition of "Open Source" is based on the Debian Free Software Guidelines which are as stated below:
    The Open Source Definition
    Introduction

    Open source doesn't just mean access to the source code. The distribution terms of open-source software must comply with the following criteria:

    1. Free Redistribution

    The license shall not restrict any party from selling or giving away the software as a component of an aggregate software distribution containing programs from several different sources. The license shall not require a royalty or other fee for such sale.

    2. Source Code

    The program must include source code, and must allow distribution in source code as well as compiled form. Where some form of a product is not distributed with source code, there must be a well-publicized means of obtaining the source code for no more than a reasonable reproduction cost preferably, downloading via the Internet without charge. The source code must be the preferred form in which a programmer would modify the program. Deliberately obfuscated source code is not allowed. Intermediate forms such as the output of a preprocessor or translator are not allowed.

    3. Derived Works

    The license must allow modifications and derived works, and must allow them to be distributed under the same terms as the license of the original software.

    4. Integrity of The Author's Source Code

    The license may restrict source-code from being distributed in modified form only if the license allows the distribution of "patch files" with the source code for the purpose of modifying the program at build time. The license must explicitly permit distribution of software built from modified source code. The license may require derived works to carry a different name or version number from the original software.

    5. No Discrimination Against Persons or Groups

    The license must not discriminate against any person or group of persons.

    6. No Discrimination Against Fields of Endeavor

    The license must not restrict anyone from making use of the program in a specific field of endeavor. For example, it may not restrict the program from being used in a business, or from being used for genetic research.

    7. Distribution of License

    The rights attached to the program must apply to all to whom the program is redistributed without the need for execution of an additional license by those parties.

    8. License Must Not Be Specific to a Product

    The rights attached to the program must not depend on the program's being part of a particular software distribution. If the program is extracted from that distribution and used or distributed within the terms of the program's license, all parties to whom the program is redistributed should have the same rights as those that are granted in conjunction with the original software distribution.

    9. License Must Not Restrict Other Software

    The license must not place restrictions on other software that is distributed along with the licensed software. For example, the license must not insist that all other programs distributed on the same medium must be open-source software.

    10. License Must Be Technology-Neutral

    No provision of the license may be predicated on any individual technology or style of interface.
WordPress was designed to remain free to the public.

No secrets.

No surprises.

Free.

Period.


One Click Installation


"One is the loneliest number" per Three Dog Night, but an installation that requires only one click is like a dream come true. WordPress installs on many hosting providers with just a single click.

Go ahead and pinch yourself.

I'm still here.

Yep, it's true.

One. Click. Installation.


Plugins

Plugging Into Plugins


Developers are constantly developing plugins for WordPress that will help you do just about anything you can imagine. There are developers that design new plugins to be installed with a few clicks. It is no longer absolutely necessary to hire a web developer in order to add features such as:
  • Navigation bars
  • Contact forms
  • Page navigation
  • Image sliders
  • Flash
  • Security
  • Maps
  • Photo galleries
  • Shopping carts
  • Translation widgets
  • Calendars
There are so many plugins available that I could type all day long and still not be able to list them all.


As Easy As 1-2-3 To Use


Often people that do not know anything about blogging start using Blogger because it takes all the necessity of knowing HTML code out of the mix. If they blog for a few years and then decide they want to "kick it up a notch" as Emeril Lagasse would say, the Blogger blog has to be transferred to another platform. What they don't realize is that you don't have to know HTML code to run a WordPress website either.

Let me tell you from experience, WordPress is awesomely powerful and easy to use. Most of the hosting companies now provide a one-click installation. The administration menu (dashboard) is very simple to understand and navigate. Even if you do not know HTML, it is easy to keep your site updated regularly.


Designing All By Myself


WordPress has unlimited possibilities, but most people do not have unlimited funds. That's okay! WordPress allows you to sing along with Eric Carmen, I can create my website, "All By Myself". I won't say that it is as easy as learning to tie your shoe laces, but it isn't impossible either.

Not only will developing your own website save you money, it will also save you time. You don't have to call or write a programmer and then get in his queue to have your problem fixed or your site created.

I like being able to do things myself without having to wait. I do enough waiting in the grocery store check-out lines.


Themes Are Like The Wedding Tuxedo


What is the first thing that grabs your attention on a website? Yep. It is the appearance. The frou frou things like color, header, column layout, font style and ease of navigation. Themes are what dress your website the same way you don a tuxedo to attend a fancy event like your wedding.

There are not only thousands of free themes that you can download to use on your website, but with WordPress you have the option to design everything yourself.

Yay! Control!!

Yeah, I'm a little bit of a control freak, but that's a good thing.

Let me backtrack a second. Using a free theme template is risky because some Cruella De Vil type developers embed secret code that links your site to undesirable sites. Without you knowing, your site could ping to websites that eventually have you banned from the search engines.

My suggestion is that you either learn how to code the site yourself or hire someone else to design it. In the long run, it will be worth your effort or money because your website is not only secure, but designed exactly the way you want it.


Search Engine Optimization (SEO) Adds Value


Having a website crawled and ranked high by search engines is usually the goal of any website. WordPress uses coding that is search engine friendly. Because WordPress is Open Source, very creative and intelligent developers are always trying to make it better. Matt Cutts, who is currently the head of the web spam team at Google, once said, "Google Loves WordPress" for SEO.

That piqued your attention, didn't it?

Some of the features that make WordPress so Google friendly are the methods used to create tags, categories, headline formats (h1, h2, h3), permalinks, easy pings and simple layouts with clean coding. Being Google friendly means higher ranking on searches, more website visits and ultimately more money.

Could you use more money?


Multiple Users


WordPress gives the flexibility of having multiple users with varying levels of authorizations. This option enables highly configurable roles defined as:
  • Super Administrator - Access to the blog network administration features controlling the entire network.
  • Administrator - Access to all the administration features.
  • Editor - Can publish and manage posts and pages as well as manage other users' posts, etc.
  • Author - Can publish and manage their own posts.
  • Contributor - Can write and manage their posts, but can not publish them.
  • Subscriber - Can only manage their profile which means read comments, make comments, receive newsletters and announcements, etc.
Choices.


Paste from Word tool

Visual Editor And The Paste From Word Tool


Visual Editors, also known as Full Screen Editors, let you see the text being edited while it is being edited. This backend feature of WordPress helped to make if famous from the very beginning.

If you can type it in a Word document, then with the "Paste From Word" tool, you can publish it on WordPress.

Hello people! Even my mother can type a Word document!

Sorry, Mom.


Support And Community


According to the recent statistics on Google Trends, a chart comparing some of the leading platforms shows that WordPress websites outrank the rest. As of this moment, there are a reported 64,926,610 WordPress websites in the world.

Obviously, with that many WordPress users, there is a large community of people that can offer support whenever there are problems with your site. It is also easy to find developers who can add custom features to your site if you're not really into learning code. The support community does not only include intelligent developers, but the majority of people are helpful and willing to assist with any aspect of a website.


Comments

Comments From Supportive Visitors


Comments bring the site up to a whole new level of interaction. Not only can you enable/disable comments on a post-by-post basis, but visitors can Trackback or Pingback comments on their own site.

Spam comments can be virtually eliminated as well.

That is sweet music to my ears!


Archives Are My Library Of Congress


I am a "Table of Contents" type of person, so having a static archive page available for my blog was one of the features that won me over to WordPress. After publishing a post, it is automatically organized in the archives and listed for readers in an easy-to-read and easy-to-find manner.

What if you have a business website? Businesses do not usually have the same kind of archives as a blog. Since the latest content is presented first on an archive page, a store could use it with their "Newest Product" or a news site can show the "Most Recent News".


football

Designed For Blogging


Even though it can be used in many other ways, WordPress was designed for blogging. Because of this original goal, the numerous blogging features are easy to use. Some of my favorites include:
  • Excellent SEO
  • Community of support
  • Themes
  • Archives
  • Widgets
  • Categories
  • Tags
  • Plugins
  • Anti-spam
  • Threaded comments
  • Concise administrative controls
Blogging is meant to be fun even if it is work. How fun would it be to play soccer or football with only half the team? WordPress gives you the whole team of features plus plenty sitting on the benches just in case you need them.


The pages are limited only by your imagination and creativity
Erik Johansson Photo Manipulation Artist

Unlimited Page Possibilities


I like having static pages that are not posts. I do not, however, want a limit as to how many I can incorporate on my blog. It is "my" blog, right? I think Blogger forgets that sometimes. WordPress, on the other hand, allows unlimited pages.

Unlimited.

I wish that was also true for the ice cream in my freezer.

So you can have pages for a:
Get the picture?
The pages are limited only by your imagination and creativity.


WordPress security

Secure And Safe


WordPress security updates happen all the time. It is easy to know which programs need to be updated because there is an alert that remains on the blog administration dashboard until the update is completed. All you have to do is backup the site and then make one click to update.
Yep. There we go with that one click thing again.

Like I keep telling you, WordPress is not hard to use.

In the words of Lionel Ritchie, it's "easy like Sunday morning".


Technology Rich


WordPress uses HTML and CSS (Cascading Style Sheets) that allows your website to appear on an iPad, iPhone, Blackberry, Android and many other mobile devices. People having the capability of viewing a website anywhere allows your business or blog greater opportunities of success.


Optimal Growth


Having your own domain hosted on your own server with a feature rich WordPress foundation, sets your website up for optimal growth. There are limitless possibilities waiting to be implemented on your site.

Imagination makes all things possible and you can quote me on that one too.


Standard Web Compliance


The code used by WordPress is in full compliance with the standards of the W3C. "The World Wide Web Consortium (W3C) is an international community that develops open standards to ensure the long-term growth of the Web."

Being aligned with the W3C ensures your website can be viewed on the most current browsers from now and into the future.

In other words, "To infinity and beyond!"

Thank you Buzz Lightyear.


Buzz Lightyear

Upgrade With Ease


The WordPress software is constantly updated and like I've said many times before, updates can be made with just one click. So whenever you are notified in your WordPress dashboard that there is an update to the WordPress software or any other feature, be sure to make that one click upgrade.


Goodbye Spam And Don't Come Back


WordPress does not like spam. To help eliminate the spam to your website, there are tools that are built in which include an integrated blacklist and open proxy checker. As mentioned before, there are also numerous plugins available that can be installed with one click.

One. Click.

It is just so easy.

Surely this is soaking in and convincing you that WordPress is not as hard to use as you may have otherwise believed before reading this post.


Customizable Permalinks


My previous post is called Eye Love The Little Red Hen On Grave's Mountain. A Blogger blog shortens the URL to http://www.theredheadriter.com/2011/11/eye-love-little-red-hen-on-graves.html

Ugh.

A WordPress blog would allow it to be custom shortened. I would have control!!! What a concept!

Yes, I was being very sarcastic because the lack of control with Blogger has driven me almost crazy.

The link could be changed to http://www.theredheadriter.com/2011/11/little-red-hen-on-graves-mountain.html which allows all the best keywords to be in the URL - "Little Red Hen" and "Grave's Mountain".

Having the best keywords in the URL is important because the search engines will read the keywords and rank my post higher for those keywords. Don't forget, that the goal is to be optimized on the search engines so that more people will buy from your business or visit your blog.


Auto-Ping Pings And Keeps On Pinging


Pinging search engines is an important task after publishing new content to your website in order keep it active so that people will be able to find it. WordPress has a built in function that will automatically ping search engines, RSS feed sites and even blog directories.

That's even better than one click!


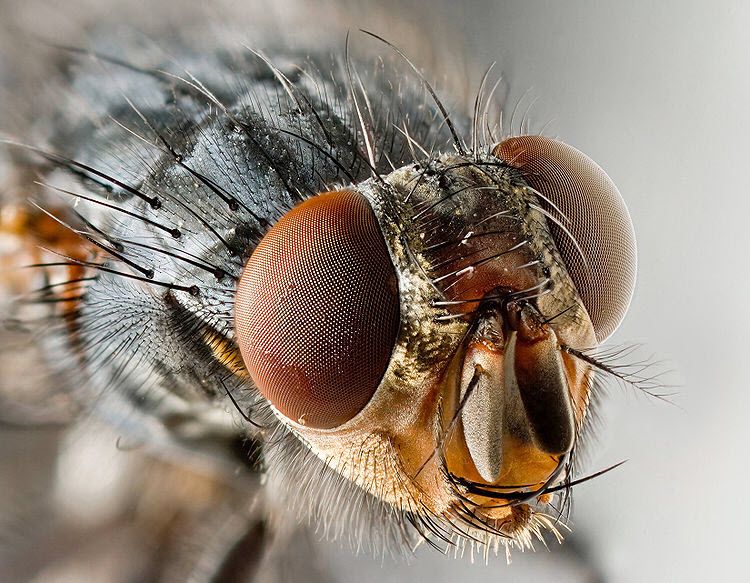
You can catch more flies with honey than vinegar

Google Analytics And Site Map


In order to know how well your website is performing, the results have to be measurable. Google Analytics is the tool that does the best job at measuring the results of your SEO strategies. After verifying website ownership, Google provides information that will assist in finding broken links, blocking content, pinpointing the keywords that draw people to your website and even more analysis by post.

Adding a site map to your website allows Google spiders to crawl all the pages more efficiently. Happy crawling spiders means higher rankings in the search engines.

It's the same concept as, "You can catch more flies with honey than vinegar."


Categories And Tags


The categories and tag features in WordPress provided an excellent reason to move my blog. WordPress allows you to be organized with all the content of your blog and to correctly identify them with meaningful categories and tags. As the blog gets bigger, it is important to be able to find content so that readers will continue to benefit from the information you have written. Without a good category system, posts are lost forever.


I've listed 25 of the outstanding features of WordPress and there are many others you will discover once you start using it.

I could quote the credit card company commercial and say that although WordPress is free, it is "priceless," but instead I want you to focus on the fact that only your own imagination and creativity will hold you back from having a totally phenomenal website.

The possibilities with WordPress are as endless as the grains of sand in the ocean.


Endless like the sands in the ocean


What do you think about WordPress now?


The Redhead Riter


How To Set Up Categories In WordPress And Jean-Luc Picard's Advice


WordPress allows so much flexibility when creating a blog. A very important feature of a blog is the implementation of categories. Let me show you how to set up categories in WordPress and also tell you why it is best if you use them.

Why You Need To Use Categories


It is important that you use categories on your blog. It is just as important that categories are used correctly.

Categories are the overall subjects of your blog. For instance, if you only blog about food, the main categories might be breakfast, snack, lunch, appetizers, dinner and desserts. Having proper categories will accomplish several things:
  • The blog will be more organized.
  • It will be easier for readers to navigate the posts.
  • Categories are better for Search Engine Optimization (SEO).
Let's learn how to set up categories on your WordPress blog and discuss more of the "why's" of having categories.

How To Set Up Categories In WordPress


In the left hand column of the guts of your WordPress blog, you will find a menu.

Click POSTS and then click CATEGORIES.


On the CATEGORIES page, you can add a new category under ADD NEW CATEGORY.

In the NAME box, type the name of the category.

If you already have categories set up like "breakfast, dinner," you
can click the dropdown to have the category listed under a PARENT category. So let's say that "dinner" is one of your main categories and is a PARENT CATEGORY. Under dinner, you might have more categories such as "vegetables, meat, bread" or "American, Italian, French, Mexican."

In my example below, the new category will be FOOD and the PARENT CATEGORY is HEALTH. Simply click the dropdown next to parent and choose
HEALTH.


Under DESCRIPTION, you can type a description of the category.

Now you are ready to actually create the category. Click ADD NEW CATEGORY.


To the right, you can now see that FOOD has been added under the PARENT CATEGORY called HEALTH. You can also see the DESCRIPTION.


Before creating the categories, our only category choice for the blog post was "uncategorized."


Now that we have created the new categories, we can see "health" and "food" which are the categories for this post.

Put a check mark next to the categories that are applicable for the post.


There is also another way to set up categories in WordPress if you are already in a post.

At the bottom of the CATEGORIES on the ALL CATEGORIES tab, click + ADD NEW CATEGORY.


First, type the name of the CATEGORY.

Then click the dropdown menu and click the word you want to use as the PARENT CATEGORY.


Now click ADD NEW CATEGORY.


The new category will appear under
CATEGORIES on the ALL CATEGORIES tab


At any time, you can see the complete list of categories by clicking CATEGORIES in the menu located in the left hand column.


While on the CATEGORIES page, you can edit or create categories.


Where the categories show up in the post depends on your theme and how you have chosen to display them. In the example below, they appear at the bottom of the post as "Filed Under".


Now that you know how to set up categories, let's dissect in more detail the reasons why you should use categories.


Categories Will Make The Blog More Organized


Do you prefer your home to look like a hoarder or a minimalist? I dare say that no one is going to answer "hoarder".

Does your blog look like you have become a hoarder of buttons, links, lists, etc.?

Are there so many things to click that your readers are frightened that your sidebars are going to jump out of the monitor and attack them?

If your sidebar looks like a hoarder, then your blog is a disorganized mess. Your readers need to be able to clearly see the posts AND easily navigate the posts by topic. Categories can help you accomplish that goal.


Categories Make It Easier For Readers To Navigate The Blog


No matter what you write about, your blog still has major themes that can be used as the parent categories. The categories can be listed in the ARCHIVES of your blog which will make it extremely easy for your readers to search the post topics.

Sometimes people want to read about just one topic on your blog or they are searching for a post they vaguely remember. Surely you don't think they are going to scroll through every post you have ever written for you blog.

Umm...No, they will not scroll through every post.

So do your readers a favor and create very specific and descriptive categories.


Categories Are Better For Search Engine Optimization (SEO)


Are you sick of hearing about Search Engine Optimization (SEO)? There is only one reason that you can legitimately ignore it....You don't care if anyone reads your blog.

If you want people to read your blog, then it is necessary to do things that will make it better crawled by the spiders and optimized by the search engines.

When search engines crawl your blog, they are looking for the main subjects. By listing the topics as categories, the crawling is more efficient.

Also remember that "more" is not always better. Do not have a limitless list of categories for each post or for your blog. Pinpoint one or two topics that convey the idea of the post. If you want to add more descriptions, use tags which I will discuss in an upcoming blogging tips post. There isn't any "right" number of categories for a blog because each blog serves a different purpose. However, I can guarantee that one hundred main topic categories is too much.

Make a plan that you are going to go back into your blog and create categories for your blog that make sense. Not only do they make sense, they fulfill the three main reasons for using categories that we just discussed. Don't wait to do the work because if you procrastinate, it won't ever get done.
Like Captain Jean-Luc Picard of the Star Trek Enterprise would say, "Make it so!"


The Redhead Riter


How To Add An Image (Photo) In A Wordpress Post - Photo Tutorial


Starting a blog can be a daunting task. Even if you are switching from Blogger to Wordpress, in many ways you have to start all over again. So if that describes you, this post will show you how to create a very basic post and add an image or photo to it.

Let's begin...

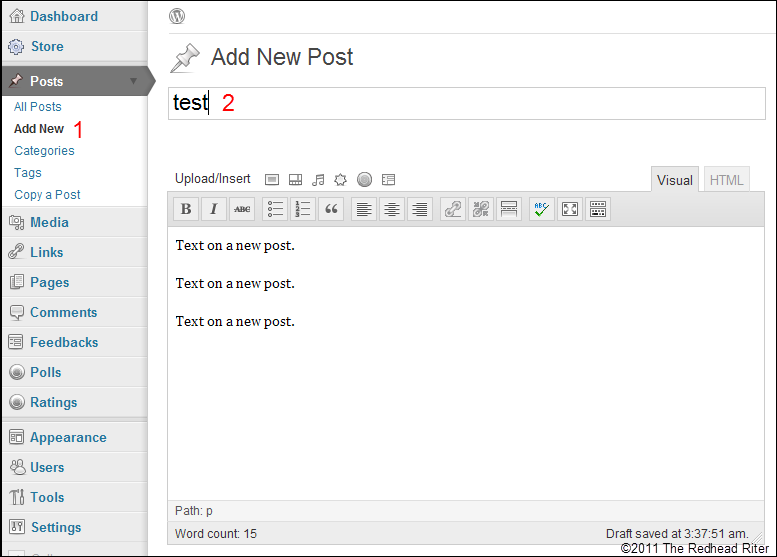
In the left navigation column of the DASHBOARD click POSTS and then ADD NEW.

A blank unpublished post will appear.

Start by NAMING THE POST.


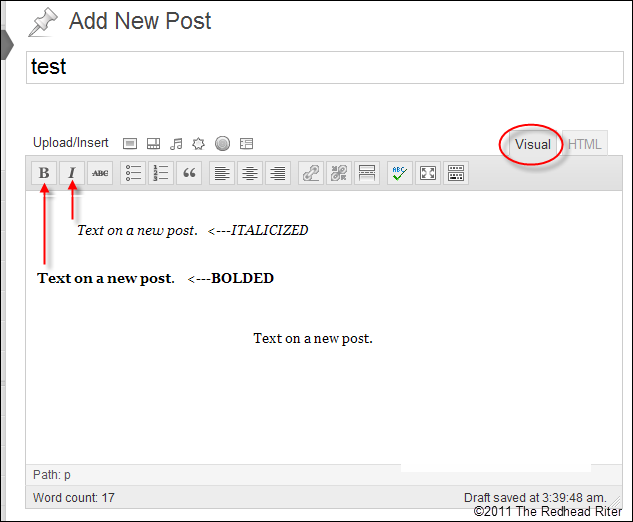
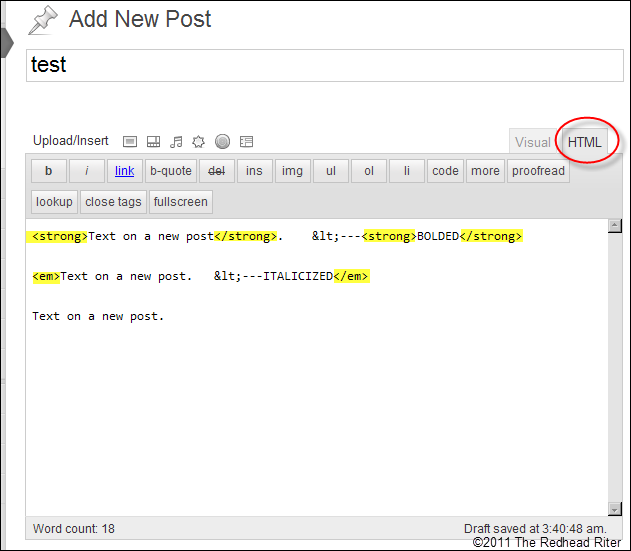
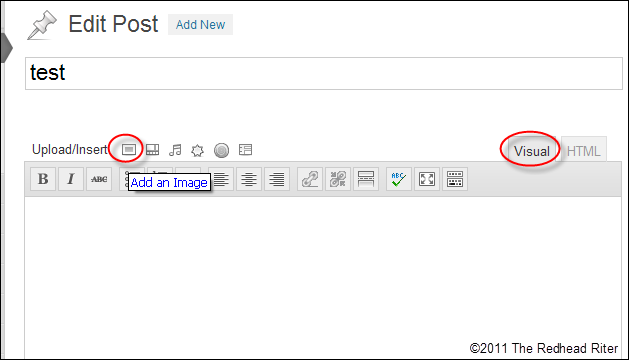
There are two ways you can view the post indicated by the two tabs - VISUAL and HTML.

The VISUAL tab will show you all the text and images without any coding.

The HTML tab will show you all the text with the coding and only the coding for the images.

Type the text for your post in the large empty white box below the horizontal menu.

If you want the text to appear ITALICIZED, then highlight the text and then click the large "I" in the horizontal menu.

If you want the text to appear as BOLD, then highlight the text and then click the large "B" in the horizontal menu.


To see the coding for the BOLD and ITALICS just created, click the HTML tab.

BOLD is shown with the "STRONG" code and ITALICS is shown as the "EM" code.


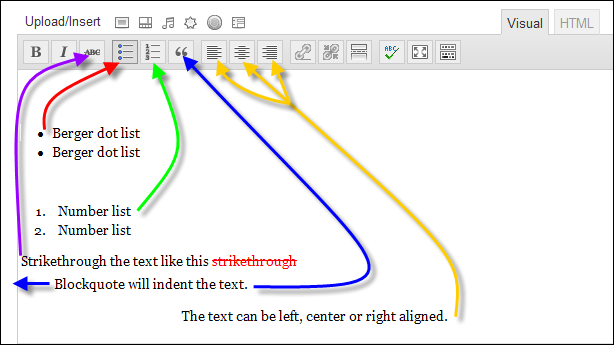
There are also other options for the text and they are located in the same menu as BOLD and ITALICS. The additional options include:
  • Berger dot lists
  • Numbered lists
  • Strikethrough
  • Blockquote
  • Alignment left, center or right


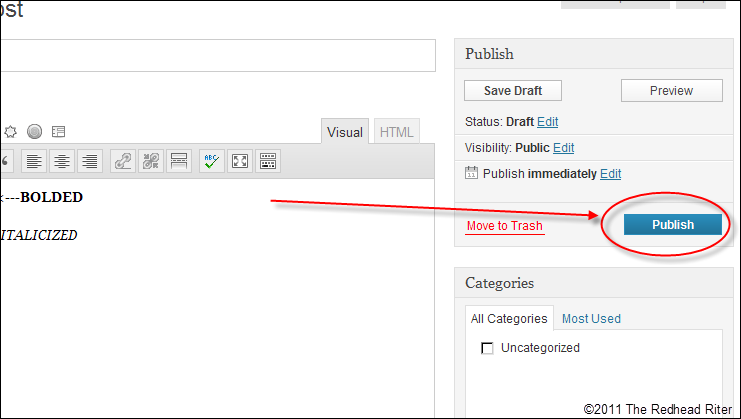
After you have completed the post, click PUBLISH which is found in the column to the right of the post.


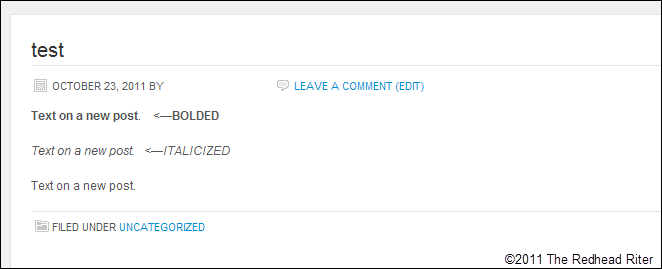
Check the blog to see the post.


To add an image to the post, first make sure you are in editor mode.

Now click where the image is to appear in the post.

Then hover over the icons in the menu above the post.

While hovering the cursor, a pop up box will appear describing the function of the button.

Click the button designated to ADD AN IMAGE.


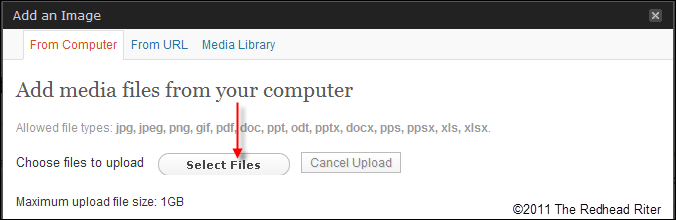
A new box will appear.

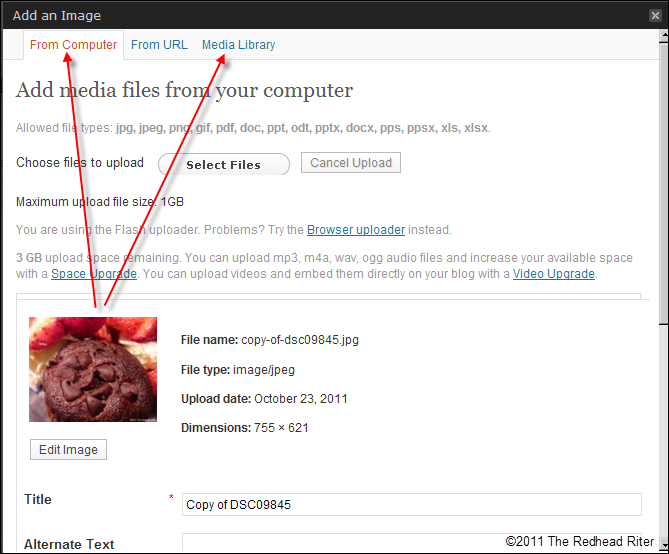
At the top of the box are three tabs. You can choose where you want to pull the image from for your post. You can choose to uploaded it FROM THE COMPUTER, FROM THE URL or from the MEDIA LIBRARY.

If the image is on your computer's hard drive, make sure you are on the FROM COMPUTER tab and then click SELECT FILES.


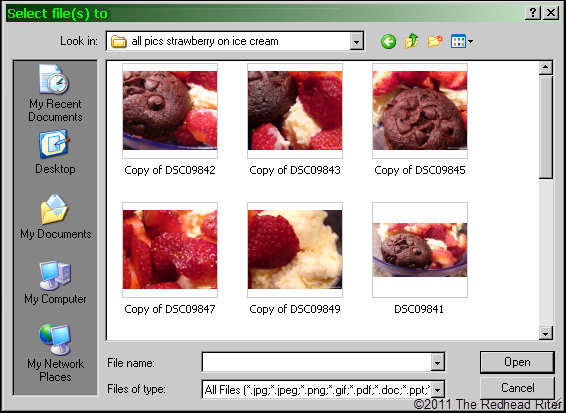
A pop up box will appear showing the files on your computer.


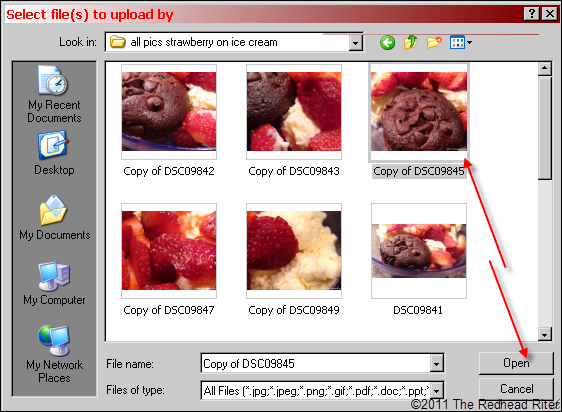
Click the image you want to insert into your post and then click OPEN.


The pop up box will disappear and the photo will appear and it be ready to save into the MEDIA LIBRARY. The MEDIA LIBRARY is where all your post photos are saved.


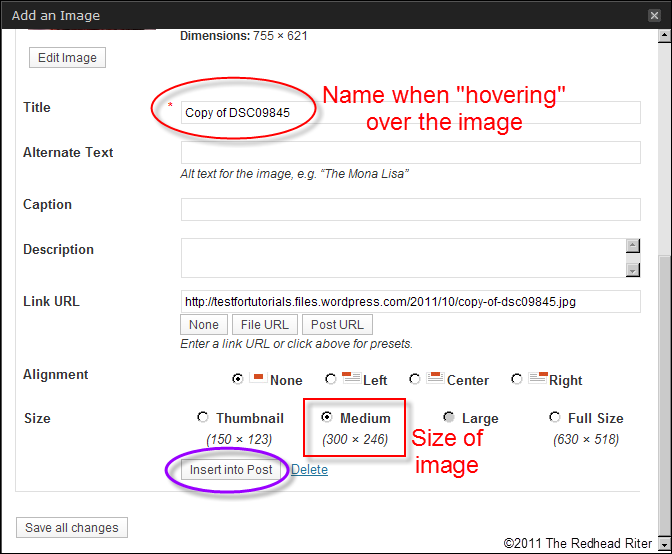
Before saving the image, there are several options that you may want to change.

The TITLE of the image will be shown when someone hovers over the photo in your post. Instead of the gobbledygook that now appears, I could name it "Rich Chocolate Devil Cupcakes" since that is really the image showing in the photo.

This is also where you can determine the SIZE OF THE IMAGE.

When you are ready, click INSERT INTO POST to insert the image into your post.


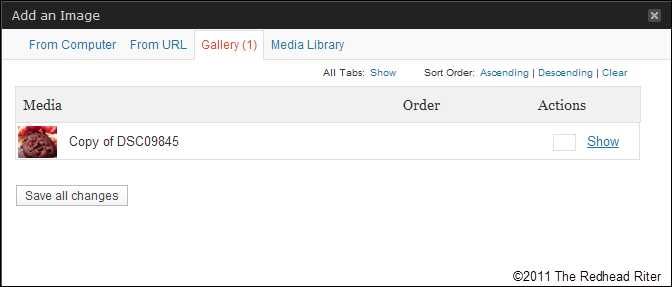
One note so that you do not panic.

If you ever get to the GALLERY and don't know what to do to get to your image again, click SHOW and you will be taken back to the screen showing all the image attributes.


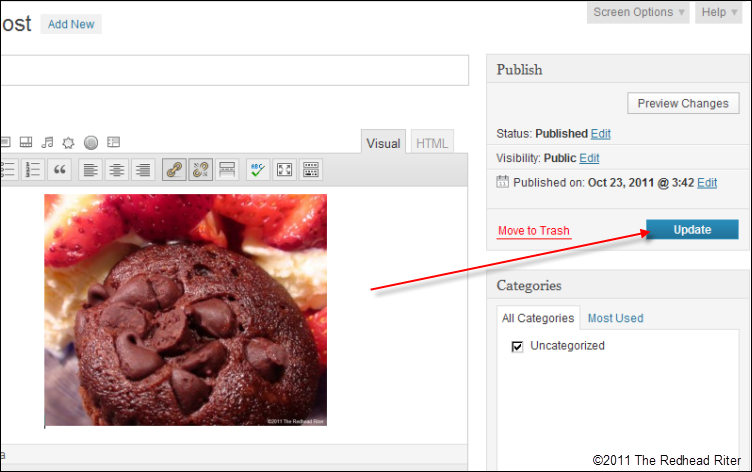
So now you have inserted the image into the post. It looks exactly how you want it to appear on your post.

Since you have previously saved your post, in the right hand column the button now says "
UPDATE" instead of "PUBLISH".

Click UPDATE to save the changes.


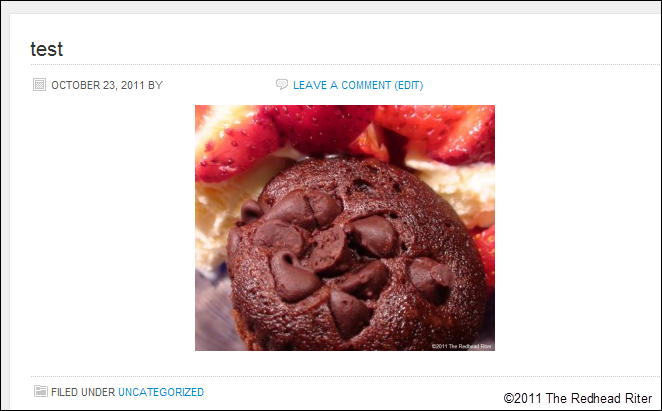
The image is now appearing on the blog.

When we uploaded the image from the computer, we chose the size to be MEDIUM (shown in the previous screen shots). It appears as MEDIUM on the blog, but it is really a much larger image. The image can be clicked and...


The image will appear as the original size of the photo.

I know it looks scrumptious. This photo makes my mouth ache to bite into the warm chocolate muffin. Well, if you want to make them, I provided the link for Rich Chocolate Devil Cupcakes.

Torture isn't it?


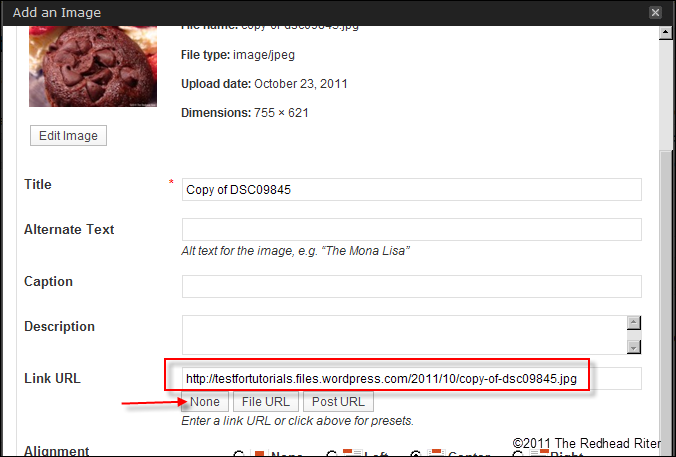
If you do not want readers to have the option of clicking on the images, you need to make a change in the image file.

This can be accomplished when you are in the step to ADD AN IMAGE.

Find the LINK URL option and click the NONE button. The link will be erased. Now the image will not be clickable.


That is how to add an image to a post in Wordpress.

I'm not sure if I should say, "Happy posting" or "Bon Appetit".


The Redhead Riter