





















To read my blog in a READER use: http://feeds.feedburner.com/theredheadriter

Showing posts with label food. Show all posts

Original Nanaimo Bars Recipe From Nanaimo BC, Vancouver Island, Canada


Known as the place with one of the most beautiful Canadian waterfronts, Nanaimo, British Columbia, located on Vancouver Island is the birthplace of the Nanaimo Bar.

I didn't change anything in the original recipe...this time...and I got it straight from the City of Nanaimo. There are so many sweet twists and additions that can be made to add to the delightful taste of the Nanaimo Bars, but I wanted to show you the original first.

Another thing we need to establish is how to say it! I have a really hard time remembering how to say Nanaimo and usually resort to calling them, "The Bars" or "Those bars from Canada." Go ahead and roll your eyes! I can't help it! With a little help from a friend, I am going to tell you how to say Nanaimo phonetically.

Nuh-neye-moe =

Nuh like when you say, "Uh in 'Uh huh'"
Neye like "N + eye"
Moe like "toe"

So is that perfectly clear now? Say it with me...Nanaimo Bars!

Okay, I think you got it!

Now, let me show you a picture taken in Nanaimo.


In the City of Nanaimo BC on Vancouver Island in Canada


That photo takes my breath away and puts all my photographs to shame! It is so beautiful!


(Taking a moment to get lost in the photograph.)

Let's stop dreaming of going to Nanaimo and make some Nanaimo Bars instead since it is much quicker and less expensive. (wink)


The Original Nanaimo Bars Recipe
From Nanaimo BC, Vancouver Island, Canada


Here is a big surprise...You don't bake this recipe for Nanaimo Bars!!! There is no reason that you can't make them yourself EVEN if you don't cook! Aren't you surprised and excited?

Let's start with the bottom layer!

Melt the butter, sugar and cocoa in the top of a double boiler. If you don't have a double boiler, a glass or metal bowl sitting on top of a small pot with about 2 inches of water works great! Actually, I like it better because the bowl is curved and it is easier to keep all the ingredients stirred.


Add egg and stir to cook and thicken.


Remove from heat.


Remember those beautiful graham crackers that I made from scratch? Well, I told you I was going to use them in something yummy and this is the recipe!!!

Crunch up the graham crackers and stir in crumbs and...


coconut and...


....nuts.


Yum. Yum. Yum.


You will be very tempted to just eat this warm mixture, but don't do it!!! I promise it will be worth finishing the recipe.


Press firmly into an ungreased 8" x 8" pan.


This is the only thing I disagree with in this recipe. I would say to press into a "greased" pan because otherwise the bars REALLY stick to the pan, but you choose which you want to do.

Put it in the refrigerator for thirty minutes to an hour. Yeah, this recipe requires patience.


You've patiently waited for about an hour and now it is time to put the middle layer together.

Cream the room temperature butter and....


heavy whipping cream and


the custard powder (Bird's really is the best and you can find it in the grocery store most of the time, but you can always order it online too), and...


icing sugar or confectioner's sugar together well.


Oh.

I almost forgot to tell you!

I did add 1 teaspoon of vanilla extract because the custard powder I purchased was plain instead of vanilla.


Beat until light and fluffy.


Remove the pan from the refrigerator and
spread the custard over the bottom layer.

Now guess what?

You have to put it back in the refrigerator for another hour.

I said you didn't have to BAKE, but I didn't say it wouldn't take a while to prepare. I thought I would just remind you of that fact.


Another hour has passed and it is time for the third and final layer.

A recipe with chocolate squares has to be delicious.


Crush up the chocolate.

Mmmmmmm.........

I love chocolate.

I love the way it looks and feels and smells and tastes and....

Oh, sorry.

So just crush it.


Melt chocolate and butter over low heat in a double boiler.


After it has completely melted, remove from heat and let cool.


Once the chocolate mixture has cooled to the touch, but still liquid, pour over second layer.


Let it chill in the refrigerator for at least a couple hours, but overnight is even better.

Oh, come on. You knew I was going to say that little bit about cooling. Just remember, you aren't having to bake it!


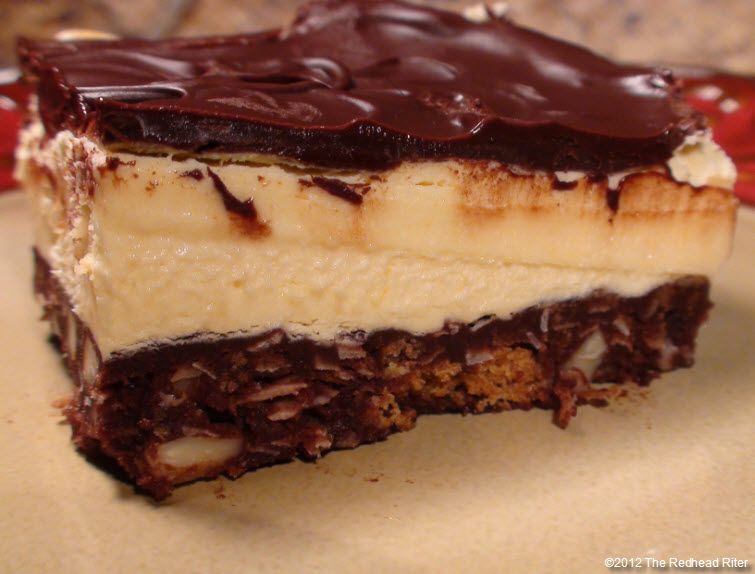
Now it is time to drool.


Doesn't the bottom crust look rich? Well, the whole dessert is rich and you won't be able to eat a whole bunch of it at once.


I can not adequately describe how smooth the custard will feel on your tongue or


how the texture of the bottom crust and the silky chocolate on the top enhances the whole dessert.


Euphoria.


Absolutely the epitome of deliciousness.


Do you know what this dessert makes me think of because it is almost as enjoyable?


Let me officially say that Nanaimo Bars make me think of this (click here).

Yeah. I'm very predictable, but you love me anyway and I appreciate you reading my blog!

I hope you enjoy the recipe!

A big shout out and lots of {{{{hugggggggssss}}}} for all my Canadian friends. Do you think I do your dessert justice?

So who is going to make Nanaimo Bars this weekend?!!!


Original Nanaimo Bars Recipe
From Nanaimo BC, Vancouver Island, Canada


Ingredients for Bottom Layer:

1/2 cup unsalted butter (European style cultured)
1/4 cup sugar
5 tablespoons cocoa
1 egg beaten
1-1/4 cups graham wafer crumbs (I used my homemade graham crackers)
1/2 cup finely chopped almonds
1 cup coconut

Directions for Bottom Layer:

Melt first three ingredients in top of double boiler. Add egg and stir to cook and thicken. Remove from heat. Stir in crumbs, coconut, and nuts. Press firmly into an ungreased 8" x 8" pan.


Ingredients for Second Layer:

1/2 cup unsalted butter
2 tablespoons and 2 teaspoons cream
2 tablespoons vanilla custard powder (Bird's works great)
2 cups icing sugar

Directions for Second Layer:

Cream butter, cream, custard powder, and icing sugar together well. Beat until light. Spread over bottom layer.


Ingredients for Third Layer:

4 squares semi-sweet chocolate (1 oz. each)
2
tablespoons unsalted butter

Directions for Third Layer:

Melt chocolate and butter over low heat. Cool. Once cool, but still liquid, pour over second layer and chill in refrigerator.

Cut with a warm knife and wipe it clean after each cut.

The Redhead Riter


Healthy & Moist Baked Apple Blueberry Oatmeal Recipe


I firmly believe in having a nutritious breakfast in the morning to start the day. Not only did my mother brainwash me, I mean teach me that it was best to always eat a good meal, but I remember having my teachers at school tell me the same thing. Even though I sleep all night, when I awake in the morning I'm hungry and half asleep, so I need something to energize me.

I don't really feel like cooking a big meal in the morning and I don't want to get up extra early to cook an extravagant breakfast before going to work either. My Healthy & Moist Baked Apple Blueberry Oatmeal recipe is the answer to my grumbling stomach. Not only is this oatmeal healthy and delicious, but I can make it the night before, cut it into one serving portions and put them in the freezer. Then I have a great breakfast ready to warm up for many, many days and all I had to do was cook one time!

Usually the problem with baked oatmeal is that it is dry, but this recipe is extremely moist! The maximum amount of liquid has been added to ensure that the oatmeal is fluffy and the fruits are plump. I really love oatmeal prepared this way and always look forward to breakfast.


Healthy & Moist Baked Apple Blueberry Oatmeal Recipe


This is a very simple recipe that you will find is easy to cook and very delicious.

So we start by whisking together eggs, milk, half and half...


eggs and milk


applesauce (I used my homemade applesauce - yummy) and...


homemade apple sauce


vanilla extract until...


vanilla extract


very bubbly. I love all the bubbles! By the time I finish whisking, there seems to be a million tiny little bubbles. When I stop the mixer, they start popping. It is a sweet sound.

Yes, I'm still quite young at heart.


bubbles


Mix together cinnamon, baking powder, nutmeg and cloves. Of course, if you spill them on the counter, use a very sharp knife to scoop up the mess because you need to add it all to get the maximum flavor.


Yes, I spill.


Add the spices to the oats and mix well.


dry ingredients with oatmeal


Add apples, walnuts, blueberries, raisins and mix well. If using an electric mixer, combine on low so that you do not cause the fruit to break up. After taking all the time to cut the apples into nice cubes, it would be a shame to mess them all up by turning them into mush.


add fruit and nuts


Pour mixture into the buttered dish and let sit for 20-30 minutes to allow the oats to absorb some of the liquid.


pour into pan


I always set the baking dish on a cookie sheet.

If you are not using the topping, bake for 55-60 minutes. The topping is not necessary to add sweetness to the dish. The fruit adds plenty of natural sweetness.

If using the topping, bake for 30 minutes. Meanwhile, in a small bowl, add the measured topping ingredients.


packed brown sugar and cinnamon


Now mix the topping ingredients with a fork. Remove dish from the oven and sprinkle the topping over the oatmeal. Return to the oven and bake for 25-30 more minutes. This is going to give you a crispier crunch on top.


fluff and combine the brown sugar and cinnamon


Remove from oven and cool for 20 minutes before serving.

You can add whipping cream, drizzle with honey, add a couple tablespoons of apple sauce or milk. If you are having this as a dessert, you can even put a scoop of vanilla ice cream on the side.


I love that this oatmeal is moist and light.


The oatmeal is healthy for you and it will stick with you until lunch.


The oatmeal is so satisfying that you will not have any mid-morning cravings for a snack.


Even if you are eating it like a dessert with tons of whipped cream and/or ice cream, you will still get full and lose the craving for more sweets. Honestly, if I can say that, you MUST know it is true!


By the way, I use Braeburn apples more than any other when baking this Apple Blueberry Oatmeal recipe because they have the perfect combination of sweet and tart. Since there are also sweet golden raisins, the tartness of the apple balances it out perfectly.


I never tire of this oatmeal for breakfast


My favorite way of eating it is with a little applesauce added on top and mixed into the oatmeal after it has been heated.


I love that I can freeze it in portion sizes and just pop one in the refrigerator the night before and then heat it in the morning. Most of all, it is a very healthy breakfast that satisfies until lunch and is packed with delicious flavors.

Here....

Take a bite.


It was good wasn't it?

I told you it was delicious!

Yes, you can come over now. I have plenty to share with you.

Dang! I hear the doorbell ringing already. How did you get here so fast?!!!


Healthy & Moist Baked Apple Blueberry Oatmeal Recipe


Ingredients:

4 eggs, room temperature
5 cups milk
1 cup half and half
1 cup applesauce, (homemade is so much better)
2 teaspoon vanilla extract
3 teaspoons ground cinnamon if using topping or 4 if not using topping
3 teaspoons baking powder
1 teaspoon nutmeg
2 pinches ground cloves
5 cups quick oats
3 apples, chopped, (Braeburn apples are sweet/tart - perfect combination)
1 cup walnuts, chopped
1 1/3 cup blueberries
1/2 cup golden raisins

Topping:

1/2 cup brown sugar
1 teaspoon ground cinnamon


Directions:

Preheat oven to 350 degrees F.

Liberally butter a 9x13 baking dish.

Whisk together eggs, milk, half and half, applesauce and vanilla extract until very bubbly.

Add cinnamon, baking powder, nutmeg, cloves and oats. Mix well. Add apples, walnuts, blueberries, raisins and mix well. If using an electric mixer, combine on low so that you do not cause the fruit to break up.

Pour mixture into the buttered dish and let sit for 20-30 minutes to allow the oats to absorb some of the liquid.

If not using topping, bake for 55-60 minutes.

If using topping, bake for 30 minutes. Meanwhile, in a small bowl, mix the topping ingredients (brown sugar and cinnamon) with a fork. Remove dish from oven and sprinkle the topping over the oatmeal. Return to the oven and bake for 25-30 more minutes.

Remove from oven and cool for 20 minutes before serving.

Add whipping cream and drizzle with honey, a couple tablespoons of apple sauce or milk. .

Serves: 12-15 depending on portion size


The Redhead Riter